When text meets image: a guide to OpenSearch® for multimodal search
Do you recall the frustration of looking through an endless sea of images, desperately seeking that one photograph buried deep within your digital library? Perhaps it was a snapshot from a past vacation, a birthday moment of your friend, or a sunrise view on a freezing winter moment. Wouldn’t it be great if you could just describe the photo and find it easily? Well, if you want to know how to do that, you’re in the right place! Keep reading to learn how to connect text to image search using the OpenAI’s CLIP model and the OpenSearch® search engine.
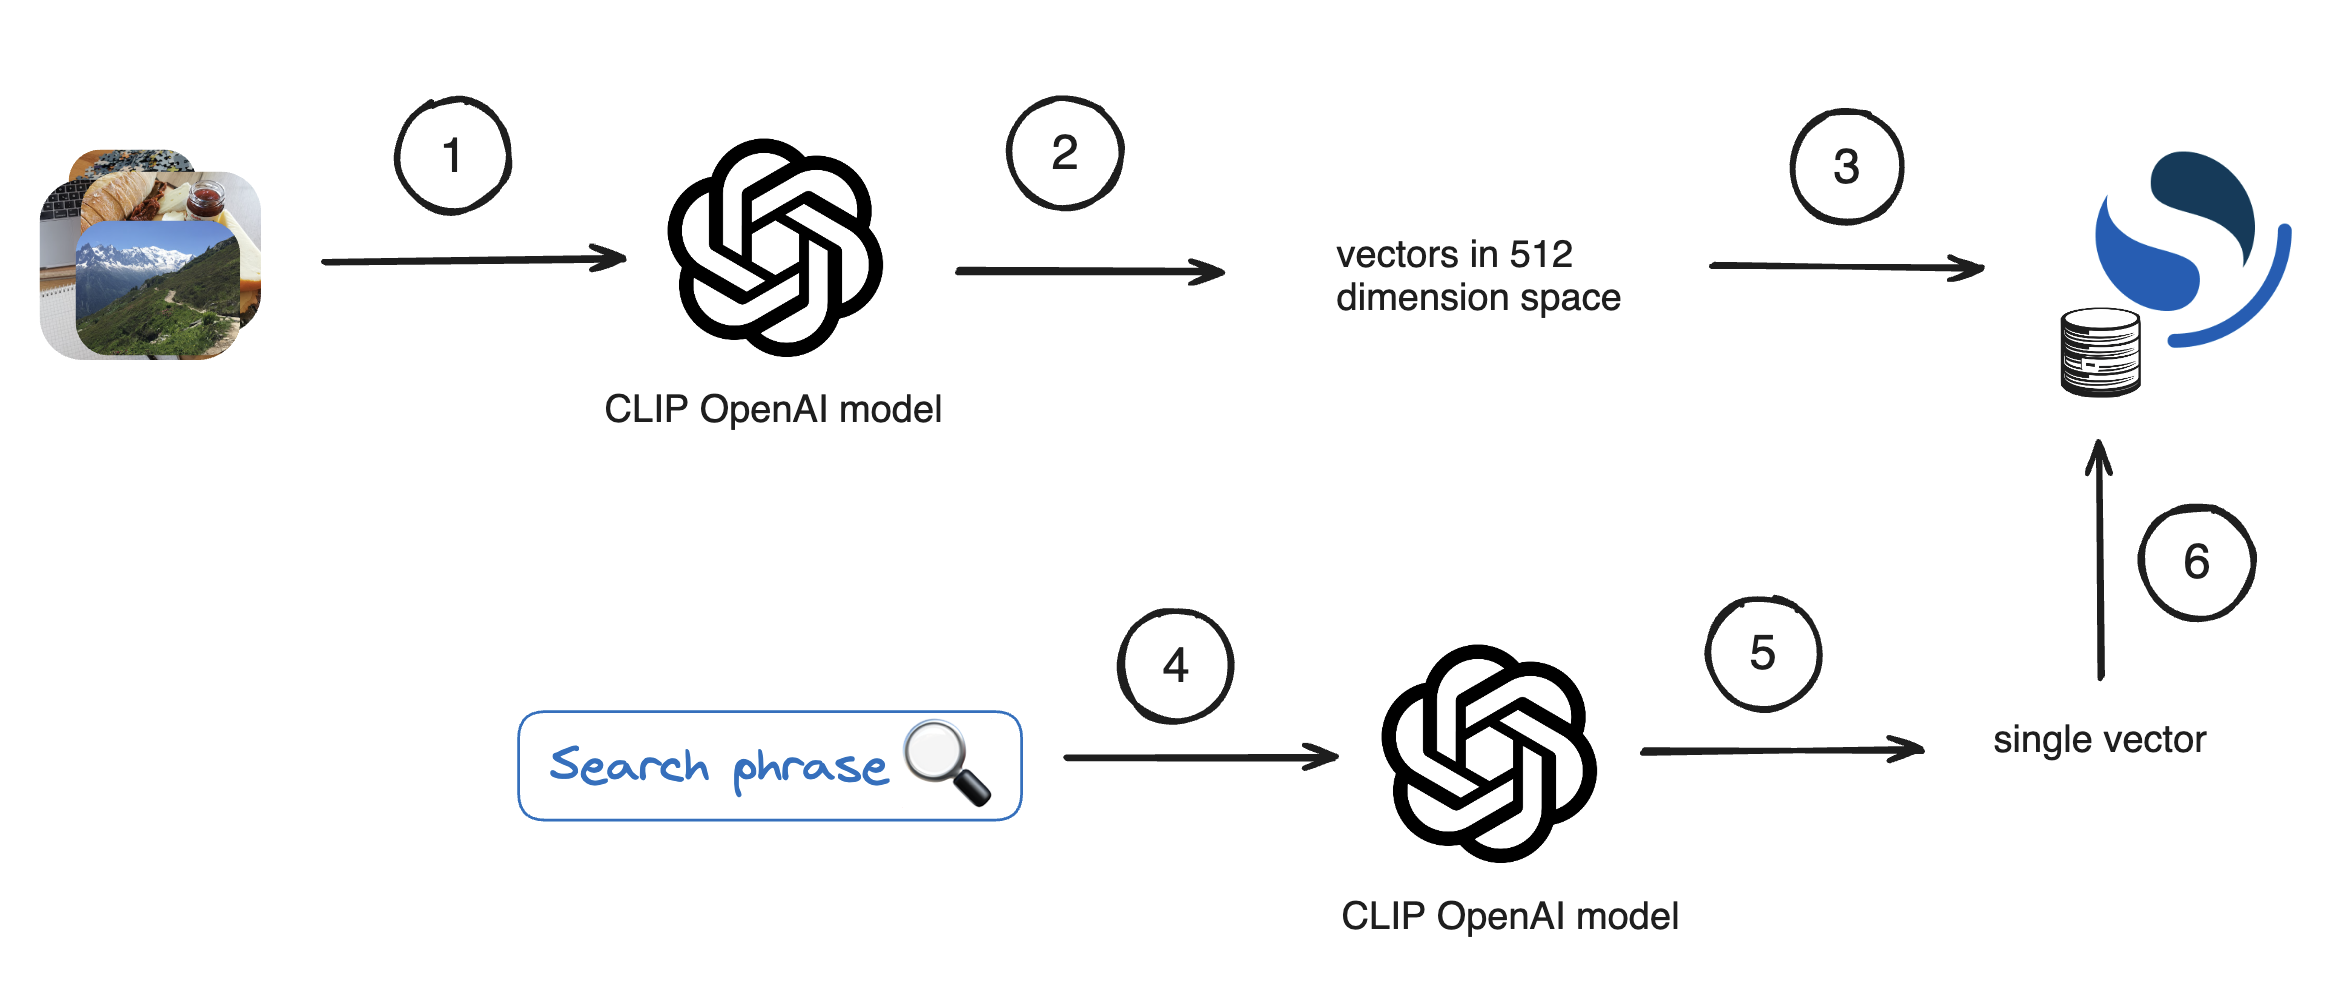
In this tutorial we’ll use a multi-modal vision and language model named CLIP. This model is special in the way that it can work with both images and text interchangeably, producing embeddings for input data that is either a text snippet or an image. These embeddings, or we also call them “vectors”, are arrays of numeric values that define the location of an object in a multidimensional space. This location is calculated by a model by looking at various features of the object.
CLIP works perfectly for our use case, on one side we can convert each photo into a vector. On the other, we can do the same to a search text description - producing another vector. Once we have that we can compare image vectors to the search phrase vector and find the closest photo to the search description.
To accomplish this, we’ll need:
- Photos to experiment with — I’ll be using a dataset from Unsplash.
- The CLIP (Contrastive Language-Image Pre-Training) model to generate vectors.
- OpenSearch to store, compare vectors, and find the nearest ones using the K-Nearest Neighbors Algorithm.
Here is the plan:
- Download photos.
- Process each photo using the CLIP model and retrieve the generated vectors.
- Store the vectors and corresponding photo URLs in OpenSearch.
- Process a search phrase using the CLIP model.
- Retrieve a single vector.
- Send a similarity search request to OpenSearch and retrieve the closest photo.
If you’re unsure where to begin, don’t worry; we’ll navigate through each step together!
GitHub repository with complete code
For easy access to all the code that we’ll discuss, find the complete implementation in the GitHub repository I recommend cloning the repository and running the steps in a Jupyter notebook.
Set up the Python environment
In this tutorial, we’ll use Python notebooks. If you haven’t already set up your Python environment, it is time to do so. First, install Python by following steps from www.python.org. Next create a Python environment. This can be done in different ways, below is how I did it using Conda. However, your setup steps might be different.
conda create --name photo_env
conda activate photo_env
conda install pip3
conda install pandas
conda install -c anaconda ipykernel
python -m ipykernel install --user --name=photo_env
Now when running a notebook you can select photo_env as your environment to perform actions.
Download the archive with image references
Unsplash offers a great collection of high quality images that we can use for this project. There are two versions of their dataset and we’ll use the smaller version, called “Lite”. It contains approximately 25,000 pictures. To obtain the dataset, follow these steps:
- Visit the Download section of the Unsplash datasets repository: Unsplash Datasets Repository.
- Download the archive provided in the repository.
The archive itself doesn’t contain images, it contains only the corresponding URLs of the images. The URLs are in the file photos.tsv000. There you’ll find a list of records for each photo, including URL information:

Download all images
To store and later display images by URL we need to establish a connection between each downloaded image and its unique identifier. While photos.tsv000 contains both the image id and URL, the image URL isn’t easily derived from the id.
It’s tempting to use image id as it’s short and has no special characters, making it suitable as a filename for downloaded images. Yet this approach would require searching through photos.tsv000 each time we need to retrieve the image URL by image id. This is quite inefficient.
To simplify the process and ensure that we only need to read photos.tsv000 once during the image loading phase, we’ll embed the URL into the filename of each downloaded photo. For example, here is how we can achieve it for the first row from photos.tsv000a:
bygTaBey1Xk
https://unsplash.com/photos/bygTaBey1Xk	https://images.unsplash.com/uploads/1413387620228d142bee4/23eceb86
2014-10-15 15:40:40.111061
t	4635	3070	1.51
jaspervandermeij	Jasper	van der Meij
PENTAX RICOH IMAGING
GR	100	14.0	18.3	8						1708356
19085	sea and rock cliff with grasses under cloudy sky
Neist Point	57.428386927437906
-6.7830279999999998	30.348905999999999
LcE{wnIVRixt~WR+NGjbxukCWBWB
For the photo above the URL is https://images.unsplash.com/uploads/1413387620228d142bee4/23eceb86. However, because filenames shouldn’t contain forward slash /, we need to do a small trick - to embed the URL into the filename, we’ll replace / with a different character, such as !. Thus, the filename becomes https:!!images.unsplash.com!uploads!1413387620228d142bee4!23eceb86. Later, when we need the URL, we’ll replace ! back with /.
To implement this process, move photos.tsv000 to your project directory and run 1-load-images.ipynb, which contains the necessary code to execute the embedding of URLs into filenames:
import csv
import os
import requests
from urllib.parse import urlparse

# Create a folder to store the images if it doesn't exist
folder_name = 'photos'
if not os.path.exists(folder_name):
    os.makedirs(folder_name)

# Read the TSV file and extract photo URLs
with open('photos.tsv000', newline='', encoding='utf-8') as tsvfile:
    reader = csv.DictReader(tsvfile, delimiter='\t')
    count = 0  # Counter for downloaded images
    for row in reader:
        photo_image_url = row['photo_image_url']

        # Replace "/" in the URL path with "!" to be used as a file name that we can reconstruct into URL later
        filename = photo_image_url.replace("/", "!")

        try:
            # Download the image
            photo_image_url = f"{photo_image_url}?w=640"
            response = requests.get(photo_image_url)
            if response.status_code == 200:
                # Save the image to the folder
                count += 1
                with open(os.path.join(folder_name, filename), 'wb') as f:
                    f.write(response.content)
                print(f"Downloaded image {count}: {filename}")
            else:
                print(f"Failed to download image {filename}")
        except Exception as e:
            print(f"Error downloading image {filename}: {str(e)}")

print("All images downloaded successfully.")
Wait a bit while we download ~25,000 images. You can see the progress in the notebook.
Prepare OpenSearch
We’ll use OpenSearch both as storage, as well as a search engine that can work with vectors.
Start by creating an Aiven for OpenSearch® service from the Aiven Console.
To connect to the OpenSearch cluster you’ll need its Service URI. Find this value on the landing page of the service.
To avoid hard-coding credentials in the code, we’ll use python-dotenv. This means that all credentials should go to an environment file which is excluded from the repository. Create .env and add the Service URI there (see .env.example).
SERVICE_URI='add your OpenSearch service URI here'
You’ll also need python dependencies for OpenSearch and for Dotenv, install them:
pip install opensearch-py
pip install python-dotenv
Now you’re ready to run the code from the second notebook. Open 2-prepare-opensearch.ipynb and run the code to create an index with the name “photos”:
from dotenv import load_dotenv
load_dotenv()
SERVICE_URI = os.getenv("SERVICE_URI")

from opensearchpy import OpenSearch
opensearch = OpenSearch(SERVICE_URI, use_ssl=True)

from opensearchpy import OpenSearch
index_name = 'photos'
index_body = {
  'settings': {
    'index': {
      "knn": True
    }
  },
  "mappings": {
            "properties": {
                "embedding": {
                    "type": "knn_vector",
                    "dimension": 512
                }
            }
        }
}

opensearch.indices.create(index_name, body=index_body)
OpenSearch can work with dynamic schemas, so creating an index isn’t usually mandatory. However, when dealing with vectors and enabling k-nearest neighbors (KNN) functionality, it’s essential to explicitly define the mappings. This ensures that OpenSearch understands which field will contain the embeddings and how many dimensions it will have.
Process images
If you followed the steps before by now you should have a folder Photos that contain Unsplash photos. Time to process each of those images, get a vector and store the data in OpenSearch. To create vectors we’ll use the CLIP model.
You’ll need to install several libraries to work with CLIP (see detailed instructions in the CLIP GitHub repo:
pip install git+https://github.com/openai/CLIP.git
pip install ftfy regex tqdm
pip install Pillow
pip install torch
Go to 3-process-and-upload.ipynb and do all the steps.
Load the model:
import os
import clip
import torch
from PIL import Image

# Load the open CLIP model
device = "cuda" if torch.cuda.is_available() else "cpu"
model, preprocess = clip.load("ViT-B/32", device=device)
Create a function that computes the feature vectors for a batch of images. This is where we rely on the torch library to preprocess the image to optimize for the available environment. Next we use the model to obtain feature vectors for each image in the batch. Finally, normalise the vectors to make sure that feature vectors have a consistent scale:
def compute_clip_features(photos_batch):
    # Load all the photos from the files
    photos = [Image.open(photo_file) for photo_file in photos_batch]

    # Preprocess all photos
    photos_preprocessed = torch.stack([preprocess(photo) for photo in photos]).to(device)

    with torch.no_grad():
        # Encode the photos batch to compute the feature vectors and normalize them
        photos_features = model.encode_image(photos_preprocessed)
        photos_features /= photos_features.norm(dim=-1, keepdim=True)

    # Transfer the feature vectors back to the CPU and convert to numpy
    return photos_features.cpu().numpy()
Create a function to index embeddings into OpenSearch:
from dotenv import load_dotenv
load_dotenv()
SERVICE_URI = os.getenv("SERVICE_URI")

from opensearchpy import OpenSearch
opensearch = OpenSearch(SERVICE_URI, use_ssl=True)
from opensearchpy.helpers import bulk

def index_embeddings_to_opensearch(data):
    actions = []
    for d in data:
        action = {
            "_index": "photos",  # Update with your index name
            "_source": {
                "image_url": d['image_url'],
                "embedding": d['embedding'].tolist()
            }
        }
        actions.append(action)
    success, _ = bulk(opensearch, actions, index="photos")
    print(f"Indexed {success} embeddings to OpenSearch")
Iterate over images and process them in batches:
import os

# Path to the directory containing photos
image_dir = "photos"

# Batch size for processing images and indexing embeddings
batch_size = 100

# List to store embeddings
data = []

# Process images in batches
image_files = os.listdir(image_dir)
for i in range(0, len(image_files), batch_size):
    batch_files = image_files[i:i+batch_size]
    batch_file_paths = [os.path.join(image_dir, file) for file in batch_files]

    # Compute embeddings for the batch of images
    batch_embeddings = compute_clip_features(batch_file_paths)

    # Create data dictionary for indexing
    for file_path, embedding in zip(batch_file_paths, batch_embeddings):
        image_url = os.path.basename(file_path).replace("!", "/")
        data.append({'image_url': image_url, 'embedding': embedding})

    # Check if we have enough data to index
    if len(data) >= batch_size:
        index_embeddings_to_opensearch(data)
        data = []

# Index any remaining data
if len(data) > 0:
    index_embeddings_to_opensearch(data)

print("All embeddings indexed successfully.")
Search
The data about images is processed and already in OpenSearch. Time to create functionality to search for an image! Find all the steps in the notebook 4-run-vector-search.
Load the open CLIP model and create a function to generate an embedding for a single text:
import clip
import torch

device = "cuda" if torch.cuda.is_available() else "cpu"
model, preprocess = clip.load("ViT-B/32", device=device)

def get_single_embedding(text):
    with torch.no_grad():
        # Encode the text to compute the feature vector and normalize it
        text_input = clip.tokenize([text]).to(device)
        text_features = model.encode_text(text_input)
        text_features /= text_features.norm(dim=-1, keepdim=True)

    # Return the feature vector
    return text_features.cpu().numpy()[0]
Create a function to perform KNN search in OpenSearch:
import os
from dotenv import load_dotenv
load_dotenv()
SERVICE_URI = os.getenv("SERVICE_URI")
index_name = "photos"  # Update with your index name

from opensearchpy import OpenSearch
opensearch = OpenSearch(SERVICE_URI, use_ssl=True)

def knn_search(text):
    vector = get_single_embedding(text)

    body = {
        "query": {
            "knn": {
                "embedding": {
                    "vector": vector.tolist(),  # Convert to list
                    "k": 2  # Number of nearest neighbors to retrieve
                }
            }
        }
    }

    # Perform search
    result = opensearch.search(index=index_name, body=body)
    return result
Create a function to display an image as a result:
from IPython.display import display, Image
import pandas as pd

# Read the TSV file into a DataFrame
file_path = 'photos.tsv000'
df = pd.read_csv(file_path, sep='\t')


def display_image_by_id(result):
    # Check if hits are present in the result
    if 'hits' in result and 'hits' in result['hits']:
        hits = result['hits']['hits']
        # Extract image_url from the first hit
        if hits:
            image_url = hits[0]['_source']['image_url']
            image_url = f"{image_url}?w=640"

            # Display the image
            display(Image(url=image_url))
        else:
            print("No hits found in the result.")
    else:
        print("Invalid result format or no hits found.")
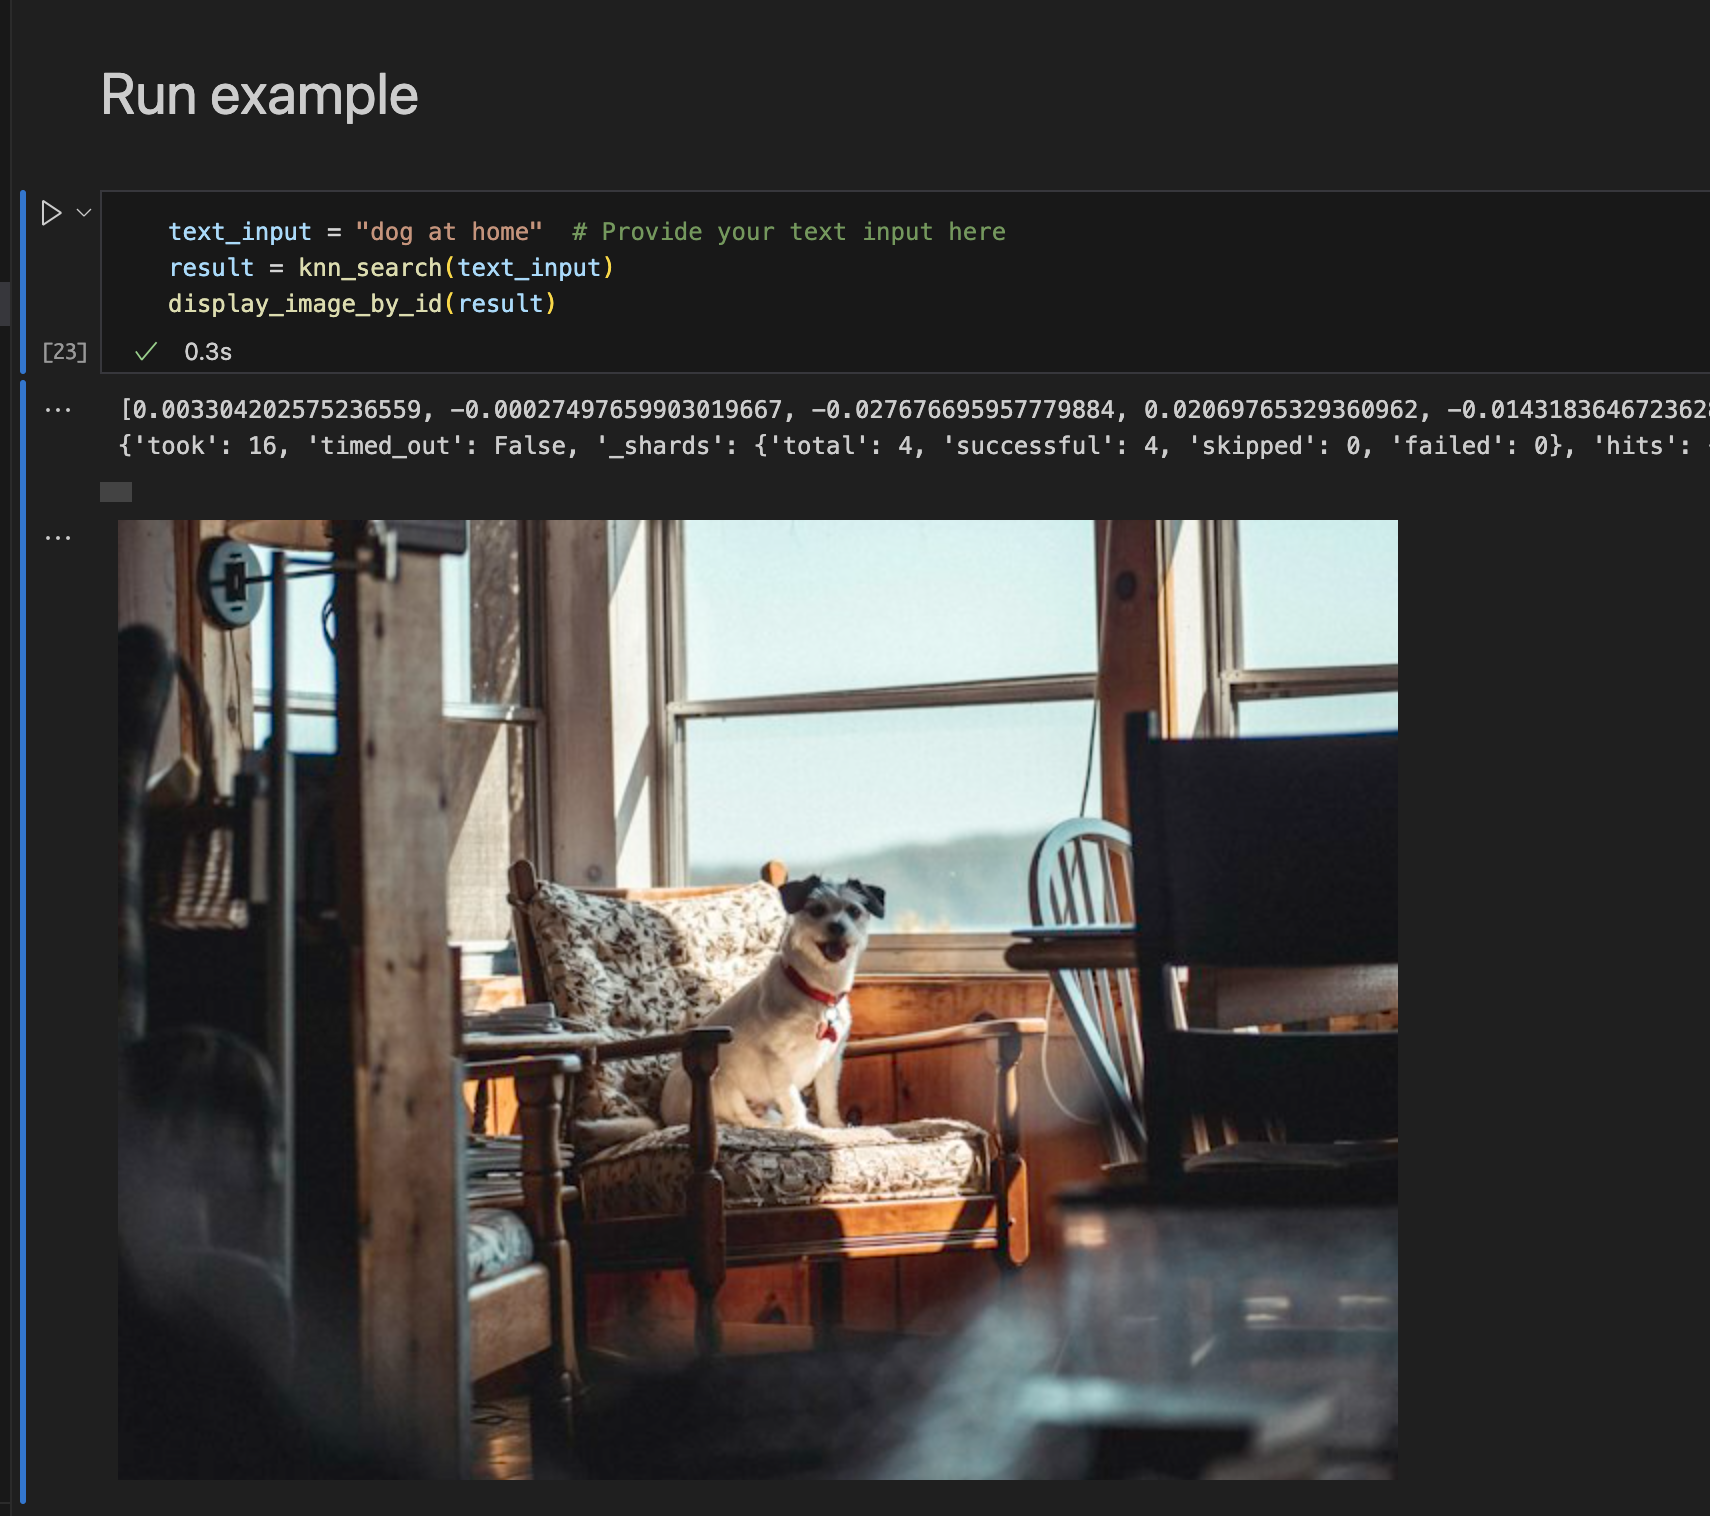
Finally, run the example:
text_input = "dog at home"  # Provide your text input here
result = knn_search(text_input)
display_image_by_id(result)
What’s next
After following this tutorial you’ve learned how to use multimodal search with OpenSearch. If you’re interested in related topics check out these articles: